Appearance
使用 Rust 开发 STM32 开发板
开发环境准备
Rust 环境准备
安装 rustup
rustup 是 Rust 的环境管理器。
对于 MacOS 系统,只需要执行一下命令。其它系统根据对应包管理器安装或rustup 官方脚本安装即可。当网络环境存在问题需要换源时,可以选择字节rsproxy、清华源等国内源进行安装。
bash
brew install rustup以字节 rsproxy 为例,加快 toolchain 等工具链安装速度:
bash
export RUSUP_DIST_SERVER="https://rsproxy.cn"
export RUSUP_UPDATE_ROOT="https://rsproxy.cn/rustup"
确定环境变量设置好后,添加默认工具链以及需要的 target:
bash
rustup toolchain install stable
rustup default stable-x86_64-apple-darwin
rustup init
rustup target add thumbv7m-none-eabi # for STM32F103C8T6 controller
此外,为加快 crates.io 拉取速度,需要修改 ~/.cargo/config.toml[1],输入以下内容:
toml
[source.crates-io]
replace-with = 'rsproxy-sparse'
[source.rsproxy]
registry = "https://rsproxy.cn/crates.io-index"
[source.rsproxy-sparse]
registry = "sparse+https://rsproxy.cn/index/"
[registries.rsproxy]
index = "https://rsproxy.cn/crates.io-index"
[net]
git-fetch-with-cli = true
安装 probe-rs
对于 MacOS 有现成安装包,对于其它系统根据probe-rs文档安装即可。也可以使用现有的其它程序烧录器,如 openOCD 等。
bash
brew install probe-rs嵌入式项目结构
打开 embassy 提供的 examples,可以观察其内部结构。
Cargo.toml
可以直接复制 Cargo.toml 中的依赖与设置,但是需要将依赖中的相对路径 path 删除。依赖项 embassy-stm32 的 features 中的 "stm32f103c8" 也需要根据实际开发板进行调整。
toml
[package]
edition = "2024"
name = "embassy-stm32f1-examples"
version = "0.1.0"
license = "MIT OR Apache-2.0"
publish = false
name = "your project"
version = "your version"

[[bin]]
name = "your project"
test = false
bench = false

[dependencies]
# Change stm32f103c8 to your chip name, if necessary.
embassy-stm32 = { version = "0.4.0", path = "../../embassy-stm32", features = [ "defmt", "stm32f103c8", "unstable-pac", "memory-x", "time-driver-any" ]  }
embassy-stm32 = { version = "0.4.0", path = "../../embassy-stm32", features = [ "defmt", "stm32f103c6", "unstable-pac", "memory-x", "time-driver-any" ]  }
embassy-sync = { version = "0.7.2", path = "../../embassy-sync", features = ["defmt"] }
embassy-executor = { version = "0.9.0", path = "../../embassy-executor", features = ["arch-cortex-m", "executor-thread", "defmt"] }
embassy-time = { version = "0.5.0", path = "../../embassy-time", features = ["defmt", "defmt-timestamp-uptime", "tick-hz-32_768"] }
embassy-usb = { version = "0.5.1", path = "../../embassy-usb", features = ["defmt"] }
embassy-futures = { version = "0.1.2", path = "../../embassy-futures" }

defmt = "1.0.1"
defmt-rtt = "1.0.0"

cortex-m = { version = "0.7.6", features = ["inline-asm", "critical-section-single-core"] }
cortex-m-rt = "0.7.0"
embedded-hal = "0.2.6"
panic-probe = { version = "1.0.0", features = ["print-defmt"] }
heapless = { version = "0.8", default-features = false }
nb = "1.0.0"
static_cell = "2.0.0"

[profile.dev]
opt-level = "s"

[profile.release]
debug = 2

[package.metadata.embassy]
build = [
  { target = "thumbv7m-none-eabi", artifact-dir = "out/examples/stm32f1" }
]
.cargo/config.toml
该文件定义了 cargo run 的内容、编译目标等。
toml
[target.'cfg(all(target_arch = "arm", target_os = "none"))']
# replace STM32F103C8 with your chip as listed in `probe-rs chip list`
runner = "probe-rs run --chip STM32F103C8"

[build]
target = "thumbv7m-none-eabi"

[env]
DEFMT_LOG = "trace"
build.rs
该文件定义了编译参数。
rust
fn main() {
    println!("cargo:rustc-link-arg-bins=--nmagic");
    println!("cargo:rustc-link-arg-bins=-Tlink.x");
    println!("cargo:rustc-link-arg-bins=-Tdefmt.x");
}
烧录程序
正确接线
使用 STLink V2 与 STM32F103C8T6 开发板进行连接[2]。
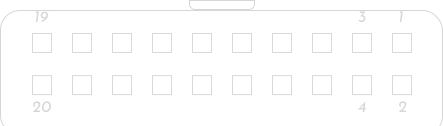
在这里只需要使用 4 根线,如下:
| 端口号 | 功能 |
|---|---|
| 1 | TVCC |
| 7 | TMS SWIO |
| 9 | TCK SWCKL |
| 20 | GND |
与 STM32F103C8T6 对应口连接即可。此外,开发板本身应该通电。
烧录程序
使用 probe-rs list 命令可以列出所有连接的设备。使用 cargo run 命令将运行 .cargo/config.toml 中的命令烧录程序,故若开发板不同,应该进行更改。
对于较新的rust版本,应该修改
config.toml而不是 rsproxy 官网上写的config文件。 ↩︎